How to Book a Wedding Officiant

How to book a wedding officiant

There is a lot to organise at your wedding. Guests, decor, food……the list goes on. You may just overlook one of the most important details. Arranging the person who is actually going to marry you!

So how do you go about us. Here are our 3 steps to booking your wedding officiant.


1. Decide on your ceremony type

You probably already know the type of wedding ceremony you want, but you may not have considered the structure and style of the ceremony. Consider the following:

  • Music or no music?
  • If music, what kind?
  • Traditional vows or writing your own?
  • Readings? Bible verses? Quotes? Poems?

These are all things that you are best to think about right at the beginning. That way you can run these past any potential officiants to see whether they can accommodate your choices.


2. Choosing the right person. Speak to them on the phone(or even better, in person)

It is important that you actually speak to the person before the wedding, rather than just emailing them. A verbal conversation tells you a lot about a person and you will probably know right away if you have natural chemistry with the person. Ok, so you may never see this person ever again so does it really matter? That’s up to you and you may not be too concerned about this. If you do have natural chemistry with the officiant however, this can be pivotal in transforming the ceremony from good to great!

If you already know somebody that you would love to perform the ceremony, this is even better and makes your job a lot easier. Contact them immediately so they can reserve the date if they are still available.


3. Get advice from others on who to choose

If you don’t know anybody who could perform the ceremony, the next best option would be to ask your friends and family if they know anybody. Maybe you were at a wedding and you liked the officiant who conducted the ceremony? You may feel more comfortable to go with somebody who conducted the ceremony for some of your friends or family? Especially, if they have been recommended to you.

If you get no suggestions from family and friends, the next option would be to browse some wedding directories and look at reviews. This is less personal so make sure you call any potentials and speak to them over the phone before agreeing to anything.

Oh….and I almost forgot! Make sure they can legally marry you! You don’t want to miss that! Check the rules of wherever you live and ensure they have the required certifications to perform the ceremony.

Once you have booked your wedding officiant, here are the questions you should ask at your first meeting

Wedding Photographer Checklist

Wedding Photographer Checklist

Booking a wedding photographer is probably one of the most important vendor bookings in any wedding planning checklist. The reason for this is the value that is held in a photograph. Unlike most other vendors that provide a service which you benefit from for pretty much just one day, a photographer provides you with a memory of your day that will last forever. The seemingly eternal value of a photograph is what makes finding the perfect photographer such a difficult choice that so many couples spend weeks chewing over. To make things even harder, there are literally thousands of photographers to choose from with different styles and varying prices. So how can you find the photographer that is right for you? Follow the steps below in our wedding photographer checklist and you are unlikely to be disappointed with your choice.


1. Think About Style

Before you start emailing photographers, it’s a good idea to think about what style of photographs you want. Your wedding theme may help determine this, but if not, try creating Pinterest boards. Add any pins you like the look of, then start refining until you come up with a unified style. Read our Pinterest guide on how to do this. Once you have a style it will be easier to find photographers that match the style you are going for.


2. Begin the Search

Now it’s time to start looking for photographers. The difficult part of this is finding photographers who are willing to travel to the location of your wedding. Some photographers are willing to travel worldwide whereas others will only work within their own city. Trying to work out who caters to your area can be a tricky business. Good quality wedding directories can be useful in working this out as they show who is available to book within you area. You can also filter by style to refine the number of photographers to choose from.


3. Initial Enquiry

Now that you have a list of potential photographers(hopefully 10+), you can begin to email them to ask whether they are available on your wedding date? This email is purely to check their availability. Don’t feel obliged to book them straight away.

Once you have the responses of which photographers are available, you now need to consider which one is your favourite. The most important thing is to go with the photographer that “feels” like the right fit. You will get an impression of what they are like by their email communication. It’s worth noting that a photographer who responds promptly to emails is very useful as you will need to do a lot of going back-and-forth once you have booked them. A fast response helps a lot! If you can, call the photographer to chat about the wedding with them. A photographer has a very active role within your wedding day and you will be spending quite a bit of time with them so it’s important to find somebody you click with. Going to wedding fairs is a great way to meet potential photographers too as you can chat with them face-to-face and get an impression of their personality, their work and their availability. You may find somebody you love and book them right there! Saves a lot of research and emailing.


4. Meet up

Your photographer is now booked and it’s time to go over some of the finer details of what you expect from them on the day. They may suggest meeting at the venue to look at some potential spots for good wedding shots(this would include couple shots, group shots etc.) They will also discuss any specific moments you would like them to capture(e.g. specific family members during the ceremony) and any speciality shots you would like taken(e.g. aerial drone shot). Not only is this very useful in helping the photographer(and you) in determining what you are looking for, it is a great opportunity to get to know the photographer better so you don’t have to go through introductions etc. on the day of your wedding. We have a hack on what to ask your photographer.

If you created a photography board on Pinterest, show this to the photographer to allow them to get a better of idea of the images that you are expecting them to produce. This makes their job easier and will ultimately give you a better result.


If you follow these steps, you are sure to have a photographer at your wedding who feels like a completely natural fit and creates photographs that are wall-worthy for many years in your home.

If you found this hack useful, you may also enjoy our videographer checklist

Pinterest Wedding Guide : 4 simple steps to plan your wedding on Pinterest

Become a Pinterest Wedding Master


In recent years, Pinterest has become a central part of any Bride’s wedding planning tools. This modern day scrapbook is loved by millions of people across the globe for its ability to curate your inspiration in a matter of minutes. There are many uses for Pinterest, but today we are just looking at the main ways you can use it to help you plan your wedding. So let’s start planning your Pinterest Wedding.


1. Start with a “theme board” and pin like crazy!

This is a great place to start. Create 1 board. Yep, just 1. Then start pinning like crazy! Do some searches for any ideas you already have(if you don’t have any ideas, don’t worry. Just do a generic “wedding” search) and pin anything you like the look of. If you have already chosen your wedding theme, it’s still a good idea to create a theme board. Do a search for your wedding theme e.g. “rustic wedding” and see what comes up. Then get to pinning.


2. Refine your pins

Now that you’ve been pinning like crazy, you should have a decent number of pins. It’s time to go through your pins and start removing the ones you’re not sure of. Our rule is “if you don’t love it, don’t have it”. Delete that pin! The idea with this is that you should end up with a list of pins that you absolutely love…..every single one of them! This will help you to clarify your style ideas.


3. Confirm your theme

Take a look through your pins in your theme board and see if there are any running “themes”. There may be an obvious theme that jumps out at you, but it may not be that clear. If it’s not, think about the “feel” you want to create at your wedding(e.g. relaxed or formal) and see what pins would best match this. You should then be able to pick a theme based on the pins you have. Remember, the theme could be based on anything! Season, colour, style etc. Think outside the box.


4. Create “Category boards”

We’re not finished with the theme board yet! It’s going to be extremely helpful with this next step in your Pinterest wedding planning. Now that you have chosen a theme, it’s time to look at that list of pins again and start categorizing them. Let’s say that you have lots of pins with flower ideas, create a board called “Flowers” and pin your existing flower pins to that board. You may not have that many pins for this category, in which case you can go a little crazy with the pinning again for this category only. When you have a good number of pins, we need to refine them again. Choose your favourite pins from the “Flowers” board and work around them, removing pins that clash with them. Try to make the board a consistent style.

Congratulations! You have just chosen your flower style. When you book your florist, you can just send them the link to your “Flowers” board(much easier than going back and forth with emails and phone calls!). They will instantly get an idea of what you want and you will probably achieve a better result than if you had to explain everything to them. A picture speaks 1000 words. You can take this a step further and make it a “shared board” and brainstorm together(more on this below).

Do this for every category, pinning out of your “theme” board into newly created category boards. Create a board for every category. It’s up to you how specific you get.

By the end of this process you should have made all your style choices in multiple boards. These can be shared with whoever you want(venue, vendors, fiance, bridesmaids, rest of wedding party etc.) whenever necessary.


Your Pinterest account has just become your portfolio for your wedding planning. Incredibly useful!

Pro tip: Get the Pinterest app on your phone. That way, you have always got your portfolio with you if you ever need to check it.


Making use of shared boards

Pinterest allows you to create “shared boards” which are collaborative boards where 2 or more users can contribute to the same board. If your fiance is on Pinterest, create a shared board with them and bounce ideas around. If you like, you can do the same with your wedding party to get ideas flowing. This can be a great way to get people involved in the wedding planning.

One of the best ways to use shared boards is sharing them with your wedding vendors. As noted above, you can share your category boards or even your theme board with each vendor respectively, giving them an idea of what you are looking for. This makes their job easier and reduces the email communication needed to confirm details(let’s face it, you’ve got enough emails to be dealing with!). The biggest bonus of this is that you will probably end up being happier with the results as they will more closely resemble your Pinterest board!


Pinning from other websites

Don’t forget that you can pin from other websites into your Pinterest boards. Install the Pinterest browser button to allow you to pin as you browse. You could even create a “Potential vendors” board and pin vendors into it direct from their website. This is a great way to gather inspiration as you go.

And that’s it! This simple 4 step process is guaranteed to make your wedding planning a lot simpler and reduce the brain-strain when making your style choices.


Wedding Planning Spreadsheet Template

Wedding Planning Spreadsheet

Planning a wedding is guaranteed to stretch the length of your existing to-do list. Don’t underestimate this! Many people will try to keep all their to-do’s, costs and vendor information in their head(this is guaranteed to lead to massive wedding planning stress!). There are many tools out there which are designed to help you manage the planning process and most of them can be quite useful. In our eyes however, nothing beats a good old-fashioned spreadsheet. It’s completely customisable so it works around the way you work. Not the other way round. Download the spreadsheet to help get you started.

Don’t be scared to move things around, delete columns, add columns, rename columns….whatever you want. Make it work for you. This is just a starting point. How you customise it is up to you.

Within the spreadsheet, there are several sheets for different aspects of your wedding planning. We have included 2 versions of the wedding guest list. You can use both or just 1 depending on the way you work. We suggest starting in Guest list 1 then copy/pasting over to Guest list 2 once you have refined your list.

Pro tip: save the spreadsheet in the cloud and share it with your fiance. That way, you have the spreadsheet with you wherever you go(venue visits etc, decor shopping) and you and your fiance can stay up to date when you are not together.


Wedding Binder : The Ultimate Guide

Starting your wedding binder.

So you’re getting married and it’s time to start thinking about the planning. How will you handle the bucket-load of information that is about to be shovelled on top of you? With all the apps and fancy websites flying around with a host of planning tools to choose from, many people still opt for the good old fashioned wedding binder.

If you are thinking about going down the wedding binder route. Here is our guide to the best way to set it up.


Building your wedding binder

So the first thing you will need to do is get your supplies.

  1. Select your folder. The choice of folder is down to your own personal taste. If you’re having a simple wedding, you probably don’t need a gargantuan folder. Don’t spend too much time thinking about it. Find one of a suitable size that you will enjoy using
  2. Purchase dividers – You will be using these to categorise the folder later
  3. Document pockets – For small bits of paper
  4. Business card holder – this one doesn’t need explanation. For vendor business cards. We will look at this later
  5. Zip pocket – use one of these if you want more security for certain documents such as receipts

Organising your wedding binder

Now it’s time to start setting up your binder in the most practical way possible for you. There is no “right” way to do this as everybody works differently. Below, we are outlining 2 different approaches(we call them “Standard” and “Alternative”) which we suggest are a good way to structure your binder.


The Standard wedding binder

Start with 15 sheets of paper with the following titles.

  1. Tasks
  2. Theme and style info
  3. Calendar
  4. General info(This is a boring sheet for things like Wedding insurance)
  5. Contact info – Add the following info to this sheet:
    • Wedding planner contact info
    • Wedding officiant contact info
    • Wedding party contact info
    • Venue contact info
    • Vendors contact info
  6. Budget
  7. Guest List
  8. Venue Info
  9. Wedding Party and duties
  10. Day-of timeline
  11. Table plan
  12. Vendor info(you may need more than 1 page for this)
  13. List of music
  14. Accommodation info(for both you and your guests)
  15. Transport info(for both you and your guests)

Now that you have your sheets, ready to be scribbled on. It’s now time to set up your dividers. You will need 11 dividers in total. Add the following information to each section:

Inspiration folder

Use a document pocket to capture any magazine snippets, sketches etc. which will help you define your theme during the entire planning process

Attire

  • Wedding Dress
  • Wedding shoes
  • Bridesmaid Dresses
  • Accessories
  • Jewellery
  • Groom outfit
  • Groomsmen outfits

Beauty

  • Hair
  • Makeup
  • Perfume

Stationery

  • Save-the-dates
  • Invitations
  • Name cards
  • Table seating plan
  • Menus
  • Other stationery

Decor

  • Flowers
  • Centerpieces
  • Stationery + Printables
  • Guest Book
  • Other decor
  • Favours

Bridal Shower

  • Planning Info

Rehearsal

  • Timeline
  • Other info

Ceremony

  • Ceremony Script
  • Readings
  • Music
  • Seating Arrangement

Reception

  • Timeline
  • Seating Plan
  • Menu
  • Cake
  • Drinks
  • Toasts
  • Music
  • Entertainment

Equipment hire

  • Large equipment
  • Small things(e.g. champagne flutes)

Honeymoon

  • Planning Details/To Do List
  • Travel Arrangements
  • Packing List

The Alternative wedding binder

Take 4 sheets of paper and add these to the front of your binder. Give the pages the following titles.

  1. Tasks
  2. Ideas
  3. Problems
  4. Vendors

Take 4 dividers and give them the same 4 titles as above. Add them after the 4 pages and put 1 document pocket after each divider. You should now have 4 sections with a document pocket in each. If you prefer, you can add the 4 sheets of paper after the dividers instead of at the front of the binder. Whatever you find easier.

Use the “Tasks” page as your to-do list. Add any new tasks to this page and score them off as you go. If there is any documentation or magazine snippets etc that are needed for the task, add them to the tasks section.

The “Ideas” sheet is to jot down any ideas that come to mind. This is your quick capture page. Add the ideas and review them with your fiancé when you have more time. Like the “tasks” section, add any docs to the task section which will help with your planning E.g. magazine pages, brochures, stationery samples and fabric swatches.

The “Problems” sheet as you can probably guess is for making a note of any problems that arise that need to be dealt with. Add any docs that relate to the problems to the “problems” section.

And yep, you got it, the “Vendors” sheet is for……making a list of vendors(i’m sorry if this is stating the obvious). You can add potential vendors and then take a new sheet once you have finalised them. Add their contact information and any notes about meetings you have to give you everything you need in a single view.

This approach is not often used, but some people like it as it is structured in a logical way. This is probably one for the minimalist type.


So, there you have it. 2 very different approaches. Which do you prefer?

How to Plan a Barn Wedding

How to plan a barn wedding


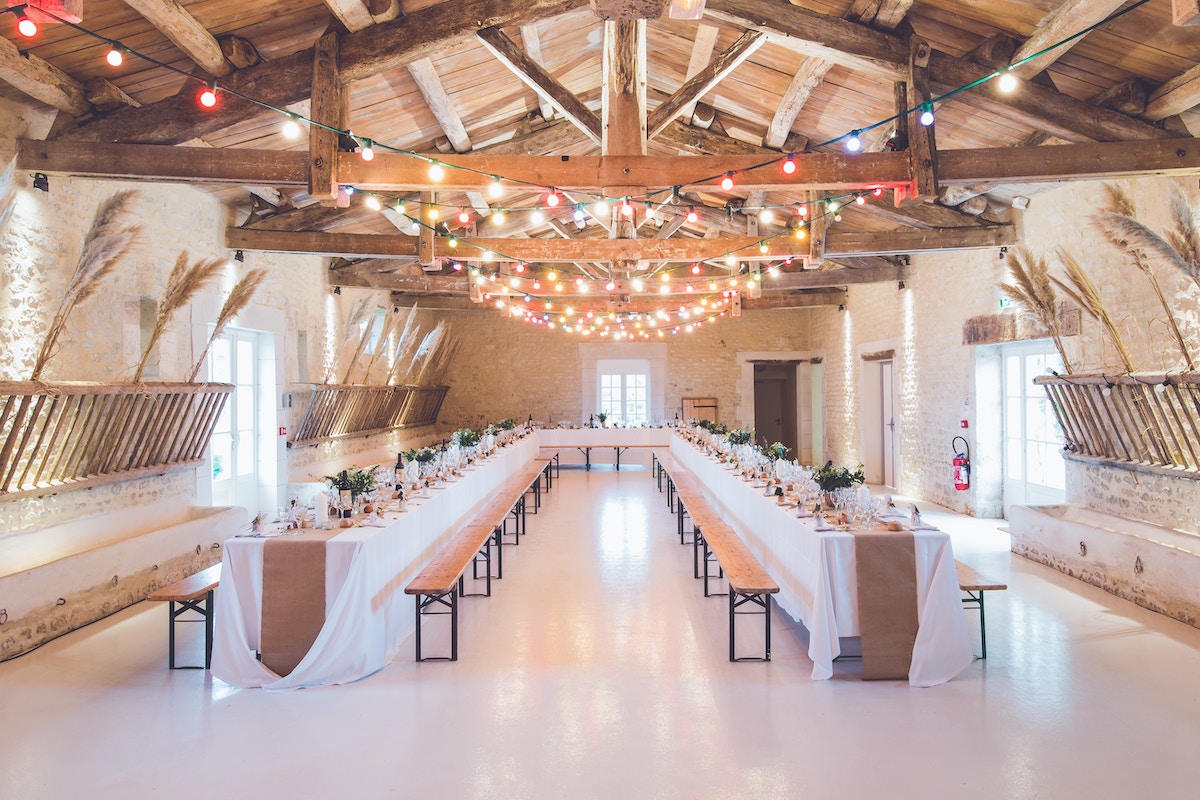
Perhaps you don’t like the idea of an uber-formal wedding, but instead, prefer the idea of your guests feeling relaxed by creating a more rustic feel. Well, you’re not alone! The dramatic rise of barn weddings in recent years, shows this trend is here to stay. So how do you pull it off? Here’s our quick guide on how to plan a barn wedding and the pitfalls to avoid.

1. Location – is it in the middle of nowhere?

There aren’t many barns in the middle of cities so location is definitely a big consideration. Think about the following points:

  • How easy is it for guests to get there?
  • Is there public transport?
  • How much would a bus for guests cost?
  • Can the bus access the venue with ease?
  • Are there wedding car companies that travel there?
  • Is there local accommodation available nearby where guests can stay?

Add these questions to your wedding venue checklist


2. Barn amenities tend to be…erm…more sparse

It’s worth noting that a barn venue may not have the same facilities as a hotel or city-centre venue and may not come bundled with the perks normally offered. This means, you may need to organise more of the “other stuff” yourself. This could include catering, drinks, MC, sound system, heating etc. When looking at barn venues, check if these things are included in the price. Otherwise, costs could end up spiralling. If the venue does not provide these services, it could end up giving you a lot more work if you need to arrange these things yourself.


3. Creating a relaxed feel

I’m going to assume you are wanting a relaxed atmosphere at your wedding(a barn doesn’t scream regal-formality). So how can you achieve this? Start by looking at wedding themes and pick one as early as you can as this will guide your style choices. Next, have a think about the different parts of your day and how you can inject informality into the timeline. Consider this:

  • Guests arriving – what is their first impression? Use decoration and signage to create a relaxed feel
  •  Drinks reception – what canapés are you having? What is the setting?
  • Speeches and meal – Table decoration is a great way to build the “feel” you are going for
  • Interactive elements – photobooths and “alternative-guestbooks” have become popular as they encourage your guests to participate in your celebration. This is great for non-dancers who would otherwise be sitting chatting all night.

4. Adding your personal touch. Barn decoration.

One of the best ways to make the day feel informal is to do something unique. Look at unusual flower arrangements, guestbooks, invitations etc. This is a quick and easy way to add something remark-able to your day(i.e. something that people will remember and talk about). Etsy and Notonthehighstreet are a great place to start. This can be a cheap way to make your day unique.


5. Food

Food tells a story. There is a big difference between salmon en croute and bangers & mash. Many barn venues will work with caterers who can provide more rustic options. A roast with winter veg is always a good option. Go for roast chicken if you want to keep everybody happy. Or if you want the wow-factor….. spit-roast hog.

Likewise with the cake. Instead of going for a traditional iced-cake. Think about a Victoria-sponge stack.


6. Favours

For your favours, take a look at Etsy or Notonthehighstreet again. There are so many great little things you can pick up for not-a-lot-of-pennies.


7. Entertainment

Finally, it’s entertainment time. Music is the most obvious thing to consider. Our top suggestions would be a Scottish or Irish Ceilidh(as it gets lots of guests dancing) or go for a Barn Disco, Rave or…..Salsa

Get more tips on how to plan a barn wedding on our pinterest boards – we add loads of ideas every day


Wedding Venue Checklist

Wedding Venue Checklist – surviving your first venue visit


If you are currently searching for wedding venues, your first venue visit may be a bit daunting. Rocketing costs and an avalanche of information are piled on you like a Jenga tower, leaving you ready to mentally topple. But do not panic. Here is our Wedding Venue Checklist, guaranteed to ease your stresses. Less like a high-intensity game of Jenga, more like a toddlers 12-piece jigsaw puzzle. Easy


Step 1: Before the visit – Building the wedding venue checklist

Write a list of your requirements prior to the visit. We suggest answering the following questions?

  • How many guests do you plan to have?
  • How many of those guests require accommodation?
  • Do YOU require accommodation?
  • How do you plan to get your guests to and from the venue?
  • How would you like your day to flow? E.g. arrival at the venue, drinks & canapés, photos, move to dining area, speeches, meal…..etc(Having a rough idea in advance helps you visualise the day when you are looking around the venue)

Step 2: At the venue

Ask questions based on your requirements from the wedding venue checklist. Make sure your requirements are met. Check off the boxes as you go


Step 3: What is included in the cost?

Many venues create a package that provides all the necessary services you require. Other venues don’t provide a package but instead have “suggested suppliers” who provide catering etc. The venue may not allow you to use suppliers that are not on this list. Every venue differs in the way they charge you, so make sure you ask them how they work. Here are some key amenities that may or may not be included in the price:

  • Accommodation for the wedding night?
  • Catering?
  • Drinks? (What are the additional costs)
  • Sound system?

It’s also worth asking if they have any additional add-on costs. E.g. some venues may offer additional decoration or fancier chairs for a higher price.


Step 4: Key questions to ask

It’s hard to know what questions you should be asking on your first visit. Here are some of the most popular questions. Add these to your wedding venue checklist.

  • Do they have appropriate facilities for your entertainment arrangements?
  • Do they have suggested transport companies?
  • Do they have suggested suppliers?(This can make your planning easier as you have the comfort knowing that the venue and supplier have worked together in the past successfully)
  • What are their table options?
  • What do other couples do? This gives you an idea of the way your day could flow?

Above all else, try to avoid “wedding planning stress”. Creating a wedding venue checklist and use it as a template for all your wedding venue visits.


Wedding Social Media – The Guide

3 ways to do Wedding Social Media?

A trend in recent years has been the incorporation of social media into your wedding day. Here is our wedding social media guide, featuring 3 of the most popular ways to make it happen!


The Unique Hashtag

Platform – Instagram/Twitter

This is probably the most common way to do wedding social media. Here’s how to do it:

  1. Find a unique hashtag, that has never/rarely been used(check by searching the hashtag within Instagram/Twitter) e.g. #DanielAndRuth2017
  2. Next, let your guests know about the hashtag. The best way to do this is to include it on stationery found on the tables. This could be on menus, place cards or on individual business cards printed specifically for this purpose(You can get 100s of business cards for less than £10). Might also be a good idea to ask the MC or best man to mention it too.
  3. When guests take pictures at your wedding and tag it with your unique hashtag, they will all contribute to your hashtag feed. Guests can check the hashtag at any point. The day after your wedding, you can check it out yourself. It’s amazing to see your day from the perspective of all your guests.

The Story

Platform – Snapchat

For those of you not familiar with Snapchat, I won’t bore you with the details. In short, the “story” feature allows you to add images and videos to a “story” which can be viewed by any of your friends for a period of 24 hours. All images and videos play back-to-back, providing a single narrative of your day. I’m not suggesting you spend your day snapping. Instead, ask your bridesmaid/best man/photographer/videographer if they can take pictures/videos periodically throughout the day and add it to your “story”. This is a great way allow the people who can’t make it to your wedding to experience your day. Add the snaps to your “memories” in Snapchat so you don’t lose them and you can relive the day at any point.


The Taggable Picture

Platform – Facebook/Instagram

This one’s easy. Upload a picture from your wedding to Facebook/Instagram in the days following your wedding and ask your guests to tag it. This is a great way to get some final thoughts on the day and thank everybody for coming. Think outside the box with the image you use. It could be your table plan, a visual guest book, place cards or just the standard group photo. Be creative.


Most importantly of all. Don’t give it too much thought. Set it up and forget it. You don’t want to miss your day because you were too focused on taking pictures etc. Live the day in the moment. Any pictures you get from your guests on social media are just a bonus.

Wedding Planning Stress? Here’s How To Beat It


Are you suffering from wedding planning stress? Struggling to motivate yourself to just… get on with it? We’ve all been there. There’s just too much to do – and you don’t want to do any of it! Or you do, but you just… kind of… can’t? Well, never fear. Here’s our guide to getting back on track.

The Two-Minute Rule

The two-minute rule is a productivity technique used by high-flyers everywhere. To put it simply: if it’ll take less than two minutes, do it now!

A big reason you might be procrastinating your wedding planning is because you’re overwhelmed by the sheer scale of the task at hand. And we get it! But the two-minute rule means you start with the easiest tasks first – and once you’ve gotten them out the way, it’ll be easier to continue. An object in motion stays in motion unless something stops it, according to Isaac Newton. So does a wedding planner! So once you’ve started, it’ll be easier to continue.

But enough physics. Let’s get back to weddings. Choose an easy task like responding to an email from a photographer or sending an enquiry to a venue (hint: it’s as easy as clicking a button on your Bridebook!) and get that done. Feel the rush of ticking a task off your to-do list… then do another one!


Don’t Wait For Motivation

Waiting for motivation to strike is a risky game to play. We often hear people (*cough* ourselves *cough*) say, “I just don’t feel motivated to – .” But do you think an athlete jumps out of bed every morning, delighted to lace up their running shoes at 5am? Are they beaming as they step out into the cold, knowing everyone else is still tucked up in bed? We’re pretty sure the answer is, “Absolutely not.” Some people are naturally more driven than others but nobody is motivated all the time.

So what’s the athlete’s secret? It’s not that they have motivation – it’s that they have a goal. They know what they need to do – and they do it, regardless of how they feel. No waiting for motivation to strike.

The same goes for you and your wedding planning. Think about your wedding day as the goal. You don’t need to wait for motivation – you’ve got a wedding to plan! These tasks need to be done and no one else is going to do them. In fact, you’re going to do them so well that if those tasks could look at themselves in the mirror, they’d feel foolish because of how well you’re going to do them! You’re going to boss them! You’re going to smash it! Those tasks won’t even know what hit them!

… You get the picture. We might have gotten a little carried away there. Motivation struck.


Little But Often

What’s that? You’re sitting down once a week to face down a forty-task-long to-do list, three pots of coffee and an entire Victoria sponge in hand? Okay, now we get why you don’t want to plan your wedding. But we’ve got a simple solution. Set aside thirty minutes each night. Just thirty minutes. That’s just one rerun of ‘How I Met Your Mother’ worth of planning. Now turn the TV off, get focused and dedicate yourself to your planning. Doesn’t that feel better?

Breaking your planning down into small chunks of time makes it much less daunting than trying to do it all in one mega planning session. Plus, doing it little and often makes it easier to stay on top of everything as you can remember what you did the day before, instead of having to cast your mind back a week or two. Get into a routine and stick to it. Once you see how much progress you’re making, you’ll be on a roll! 

So there you have it: three easy ways to beat the wedding planning blues! We’re sure you’ll have blitzed through your to-do list in no time. And remember – you can always stay on track with your Bridebook checklist. It shows you exactly what you need to do and when you need to do it to have your dream day planned quicker than you can say, “I do!”

You might also like…


Why You Need A Wedding Theme


Do you need a wedding theme? In our opinion, the answer is absolutely, “Yes, you do!” So here’s why we recommend couples choose a wedding theme – and how to get started picking yours.

1. A Wedding Theme Gives Your Planning Clarity

Look, we get it! Wedding planning is a stressful business. After all, it can feel like there are a million different things to sort: venues, flowers, table decorations, clothes, catering… Taking a little bit of time at the very start to pick a wedding theme will instantly streamline your planning by giving you a clear vision of what you want your big day to be like. Plus, when you search for venues and suppliers on Bridebook, you can filter by theme, reducing the number of suppliers you need to contact.

2. A Wedding Theme Will (Probably!) Make Your Wedding Look Better

If you don’t have at least some sort of theme, it’s incredibly difficult to make everything cohesive and you’ll probably end up with a complete mishmash of styles. Now, if “mishmash” is what you’re going for, go ahead… But isn’t that a theme? Remember, your theme can be as simple as choosing two or three wedding colours to help guide your choices. Sure, you might decide on an underwater pirate theme (and if you do, we’d love to see the photos!) – but you might also go for a sage-green wedding theme, adding pops of colour throughout your soft furnishings, stationery and floristry.

3. A Wedding Theme Helps Create Atmosphere

Your wedding theme is about more than just what your wedding looks like – it’s about how it feels, the sort of atmosphere you create. So think about the mood you want your guests to be in. Do you want them to feel a sense of glamour and luxury? Then maybe a black tie theme is for you. Or are you hoping for a more relaxed celebration where everyone can let loose? In that case, you might want to consider a more casual theme – say, something boho or rustic. Whatever you decide, it’s a huge part of what will make your wedding unique in your guests’ memories – so choose wisely!

You Might Also Like…

Stress Free Wedding Planning : 5 top tips

Your Guide to Stress Free Wedding Planning ?


Planning a wedding is one of the most task-intensive experiences we go through in our lives. But it doesn’t need to be. Here are our top tips for stress free wedding planning.

1. Make a to-do list

Getting the tasks out of your head and down on paper can really help to clear your head and visualise what still needs to be done. Try using a to-do app which can be shared with your fiance. We have created a wedding checklist with the typical tasks you will need to complete.


2. Decide on a Wedding Theme

Deciding on a wedding theme before you start planning your wedding can make the entire process a lot easier. Not only will you end up with a more consistent result on your wedding day, you will also find making decisions along the way, a whole lot easier. When you have a set theme in mind, it is then easier to choose between suppliers and outfits/decorations etc by testing whether they suit your theme.


3. Write your guest list as early as possible

Writing your guest list is a daunting task. But it needs to be done at some point. Getting this done early will make everything else so much easier. How many seats at your ceremony/reception? How many save the dates? Invitations? Table decorations? How many tables need flowers? The list goes on. When you have your guest list finalised, all these questions are much easier to answer and you can communicate with your venue and suppliers with ease.


4. Make a list of all your costs

Perhaps one of the most unpleasant tasks is tallying up the wedding costs. It could be tempting to bury your head in the sand and keep on spending without checking the total damage. This will just add to your stress as it will be niggling at the back of your mind. Do the maths early so you know how much you will need to pay later. This prevents you from overspending(getting even more stressed) and gives you the comfort that you will be able to pay the suppliers when the big day draws near.


5. Remember what it’s all about

And finally, just remember that despite all the stresses involved in the planning process, your wedding day usually ends up being one of the best days of your life. All the debating over flowers, fabric colours and table decorations fades away into insignificance when you are surrounded by the people you love most in the world who have gathered together to celebrate your marriage to the person you love MOST most.